Creative Ways to Make Your Own Tiered Stand
- May 22, 2025
- 3 min read
Updated: Feb 24
Following my post on July 11, 2024, about tiered stands, I want to share some cost-effective ways to create your own. Making a tiered stand can be a fun DIY project. You can save money while adding a personal touch to your home decor.
Affordable DIY Tiered Stands
Here are a few methods to create your own stands:
Made with a Purchased Handle
Made with Candlesticks, Jam Jars, or Slim Vases
Using Paper Plates
Made with a Purchased Handle
You can easily find inexpensive metal handles for your stand. These will work for two or three tiers. I will have some available in my online store once it opens. In the meantime, you can explore a variety of options on Amazon.
To make the stand, you need suitable plates or bowls. I suggest not using your finest china. Instead, look for older plates or shop at thrift stores. I have found various discounted plates at Home Sense and Winners for just a few dollars.
Items You Will Need:
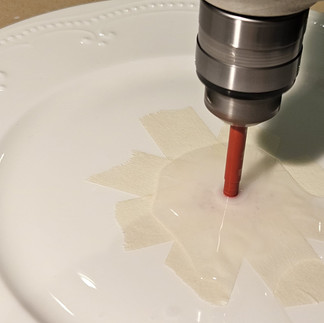
A hand drill with a 5mm diamond bit (tile bits work too, but diamond bits are better for porcelain)
Masking tape
A wooden surface (this may get damaged) to drill on
Several sheets of paper large enough for your largest plate. I recommend baking parchment because it is see-through and reusable.
A water bottle/container to pour water on the drill bit to keep it cool while drilling
A screwdriver to tighten the bottom screw on the stand
First, draw around your plate on the paper. Fold it into quarters and cut off the very tip. This will serve as your template for the center of your plate. Apply masking tape to the center of the plate and place the template over it. Use a marker on the masking tape to mark the center.
Next, apply masking tape to the other side of the plate, and you're ready to drill. When you start the hole, hold the drill at a slight angle initially. Gradually move the drill up until it is at a right angle to the plate. Keep the drilling area cool with cold water. With the drill set to medium speed, it should take just a few minutes to create the hole. Remember to keep the drill bit cool with water and do not run the drill at high speeds for more than 30 seconds at a time, or the plate may crack.

After drilling, remove the tape and wash the plates. Proceed to screw in the handle. Use the washers provided at both the bottom and top of the plates to ensure stability. Lastly, be sure to tighten the bottom screw. Voila!
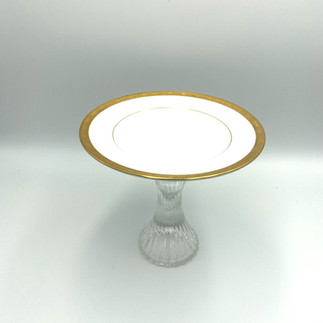
Made with Candlesticks, Jam Jars, or Vases
Another approach is to use candlesticks, empty glass jars, slim vases, or similar items as separators. These can be attached using strong double-sided tape that is removable. It's essential to choose tape that has strong adhesive properties but can be removed without harming the plates. I recommend Shyfly double-sided tape found on Amazon. If you plan to keep the stand permanently assembled, you could use a glue gun or super glue instead.

You will still need to find the center of your plates, similar to the drilling method. Cut the double-sided tape to the size needed for the bottom of the top plates and top of the bottom plates. A square piece of tape will suffice unless you prefer a perfect circle. Begin by placing your separator (like a candlestick) between the plates, pressing them together firmly. Hold the stand sideways over a soft surface to check if it's secure. Always lift the stand from the bottom plate when moving it.


Using Paper Plates
You can also make stands using paper plates. However, they are not ideal for heavy items. For this method, you won't need a drill; just a sharp awl to make holes in the center of the plates. You can choose a purchased handle or use jars as separators. Quality paper plates are essential for this project. If you want a sturdier stand, cut circles from thick cardboard and glue them to the bottoms of each plate before assembly.


Final Thoughts
Creating a tiered stand can be a rewarding DIY project. It’s an excellent way to express your creativity while being budget-conscious. Plus, you can tailor the stand to fit your style and needs. If you're interested in purchasing tiered handles, stay tuned for my store launch. Alternatively, I will have inexpensive finished stands available for you!
Paper party supplies from:
Pretty Day Party Supplies:
11430 291a Street, Unit 1, Maple Ridge
www.prettyday.com | Tel: 778 633 0299


SO CLEVER! ECOMOMICAL! LOVE THEM ALL! THANK YOU, VIVIEN!🙏💜⭐