SUSHI BALLS (TEMARI) + DONUTS
- Sep 12, 2025
- 5 min read
Updated: Sep 17, 2025


MY TAKE
You are not going to believe this but this is honestly such an EASY way to put together some delicious sushi. The hardest part is probably cooking some rice!
You can use some Nori (seaweed sheets) if you want but it is not necessary. All that is necessary is that you want to have some FUN. Make sure you have some things to add to your rice - I usually use smoked salmon, avocado, cucumber and radish and some sushi grade tuna - for example. You will need a reasonable supply of cling wrap (cling film/saran wrap) and some soy sauce for dipping your sushi.
Full recipe instructions and method below. Be prepared to have some fun followed by a delicious meal or just a starter!
They are remarkable when presented to your guests at the table, or you can set up your own DIY sushi making station so that your guests can "build their own", which makes for a fun activity (and less for you to do!).
HISTORY
SUSHI DONUTS
Origin: Sushi donuts are a very recent invention, not part of traditional Japanese cuisine. They emerged around 2016 in Australia, popularized by food stylist Sammy (@sobeautifullyraw) on Instagram. She shaped sushi rice into donut molds and decorated them with colourful additions (avocado, sashimi, sesame, edible flowers). They went viral on Instagram because of their visual appeal — bright, round, photogenic, and perfect for the “food art” trend.
Cultural Influence: They belong to the “fusion sushi” movement that began in the 1990s–2000s (think sushi burritos, sushi pizza, sushi burgers) — creative spins meant to appeal to Western audiences and social media rather than traditional sushi culture.
Today: You’ll find them at food festivals, Instagram-friendly cafes, and as a DIY idea for parties.
SUSHI BALLS (TEMARI SUSHI)
Unlike sushi donuts, sushi balls have a deep Japanese tradition. Called Temari Sushi (手まり寿司), they are small, ball-shaped sushi made by pressing vinegared rice and other ingredients (like fish or vegetables) into a round shape.
They were inspired by Temari balls, which are hand-crafted Japanese embroidered toys. Temari sushi originated in Kyoto, often prepared at home for Hinamatsuri (Doll Festival) and other celebrations, especially for children or parties because they’re pretty, bite-sized, and easy to make.
Why Popular: They have become popular as they appear elegant, jewel-like, and practical — no need for rolling mats, and they can showcase seasonal ingredients beautifully.
Today: they are still common in Japan for home gatherings, and outside Japan they’ve gained popularity as a simple way for beginners to try sushi-making. In the West they are often used a canapé style offering.
THE RECIPE - SUSHI DONUTS & SUSHI BALLS (TEMARI)
Servings: approx. 12 balls ( or 8 donuts) Prep time: 1 hour Chill time: 20/30 min
INGREDIENTS
SUSHI RICE
2 cups (430 g) Calrose rice (sushi rice)
2 cups (500 ml) water
3 tbsp (45 ml) rice vinegar
2 tbsp mirin (this can be left out if you do not have any at hand)
1 to 2 tbsp sugar
1/2 tsp salt
OTHER INGREDIENTS (these are the ones I use but you can use any ingredient you like)
2 radishes, cut into thin rounds on a mandolin OR with a sharp knife
1 Lebanese cucumber, cut into thin rounds on a mandolin or using a sharp knife OR just use a regular peeler
1 small mango, ripe but firm, thinly sliced
1 pack of smoked salmon
5 oz sushi grade tuna cut into thin slices
1 egg omelette
2 chives thinly sliced
1 avocado, ripe but firm, cut into slices using mandolin or sharp knife


FOR TOPPINGS (all optional)
Roasted white sesame seeds, to taste
Black sesame seeds
Fish eggs, to taste (Tobiko or Salmon Roe)
FOR SERVING/DIPPING
Soy sauce (Light Sashimi and Sushi type - for dipping sushi is the best but any soy sauce would do)
Wasabi (optional)
Wafu-style sesame mayonnaise (optional) which is a mix of traditional mayo, lime juice, sriracha and sesame oil. (half cup mayo, 3 tsps sriracha, 1 tsp lime juice, 1/2 tsp sesame oil
1 Jar Pickled Ginger (optional)
Sheets of Nori cut into small pieces or strips (totally optional)
PREPARING THE SUSHI RICE
Ignore the directions on the bag that the rice came from and rinse the rice only 3-5 times. The water does NOT have to run clear.
Place rice to drain in a strainer.
Drain 30 min.
While rice is draining, combine vinegar, sugar, salt and mirin (optional) together in a bowl and mix well (to help the sugar dissolve, just microwave the mixture 1-2 minutes at a time, mixing in between)
Add rice to the pot.
Bring quickly to a boil and then reduce to a simmer.
Cover the pot and DON'T touch it until the end, NO PEEKING.
Cook for 15 minutes before removing the pot from the heat but keep the lid CLOSED.
Let rice rest for 10 min and then remove the cover.
Place in a wide, flat dish to cool and lightly fan the rice while adding the vinegar mixture. (Fanning helps to give the rice the usual sushi sheen).
Mix rice gently - fluffing with a fork is best, be careful not to break the grains.
Sushi rice is best used at body temperature.
I always have a bowl of cold water available to rinse my fingers every so often (rice is sticky).
Note: If you are really in a hurry - you can buy microwavable pouches of instant sticky suhi rice! Contact me and I will give you more details about this!!
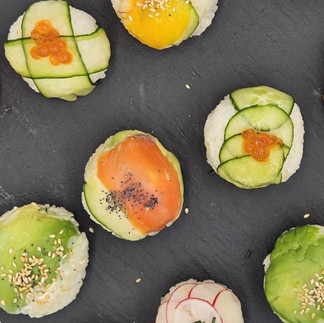
ASSEMBLING THE SUSHI BALLS
PLEASE CHECK OUT PHOTOGRAPHS WHICH SHOULD BE SELF EXPLANATORY
On a work surface, lay out a 10-inch (25 cm) square of plastic wrap. At the centre of the square, place a few slices of radish or cucumber, 1 slice of mango, 1 slice avocado, slightly overlapping the ingredients to form a square no larger than 4 inches (10 cm) (see note).
With slightly wet hands, flatten 3 tbsp of rice over the entire surface of the ingredients.
Lift the corners of the plastic wrap and place the whole package in your hand. Seal the rice up. Twist the plastic wrap tightly to create a ball. Cut off end of wrap to allow ball to stand up whilst completing others. remaining Place in fridge until ready to serve.
Remove the plastic wrap carefully from the rice balls. Place the balls on a serving dish. Top with sesame seeds or fish eggs/tobiko . Serve.


Choose different combinations of toppings to vary the sushi balls. Let your creativity guide you!
ASSEMBLING THE SUSHI DONUTS
PLEASE CHECK OUT PHOTOGRAPHS BELOW WHICH ARE SELF EXPLANATORY


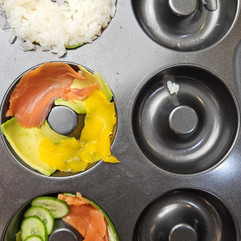


When you have finished layering rice onto filled donut pan - take a sharp knife and circle around edge of donut to make sure anything overlapping the edge of the indent is not sticking. Clear rice from centre to ensure donut will release easily. Cover whole pan in cling film and place in fridge. When ready to serve invert donut pan - tapping gently at one side onto surface of plate ..... this should release donuts ready for decorating with toppings.
GALLERY


LET'S TALK
Please let me know how you fare with this recipe and if you have any suggestions to improve it. I know that some of you will have your own family's version of this recipe passed down over years - which you may not want to part with! Send me your photos and your comments.

Every piece of your sushi looks so inviting! I will definitely give them a try ..... Thank you!